Have you ever experienced drainage problems with your washing machine that you wished would never happen again?
Washing machines are one of the most helpful home appliances you could have in your home.
And if you own one, you would probably testify.
However, problems with a washing machine are something you want to avoid as best as you can, especially problems with drainage.
Most people are oblivious of the requirements for their washing machine drainage system and at the end of the day, this lack of knowledge costs them so much.
Talk about sewer backing up into your washing to your washing machine not being able to drain properly and causing your laundry to smell.
Here are the main requirements of a washing machine drain:
- An Outlet Box
- Standpipe
- Drain Trap
- Drain line
- Vent
In this article, we will talk about everything you need to know about washing machine drain requirements so you can be sure to get it all right to avoid any painful experiences with your washing machine drainage.
Table of Contents

What are the components of a washing machine drain?
There are some components that every washing machine drainage system should have.
Although not all these are required in every jurisdiction, they sure serve you and your washer a great purpose.
Let’s dive into the components and how you can incorporate them into your existing system for a trouble-free dining system.
1. An outlet box
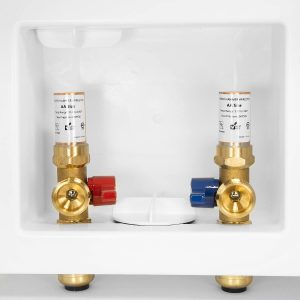
A washing machine outlet box is a plastic or metallic box that connects different hoses at a single point.
They serve as safe and quick access to shut off your water supply in case of an emergency.
The outlet box includes an opening where the standpipe is inserted with two additional removable covers where you mount the water supplies (Hot and cold).
It is a box that’s recessed into your wall and fixed tightly, where can easily access your hot or cold water valves.
If you care about aesthetics, you should definitely consider an outlet box in your new laundry or during renovations, as they provide a clean finish to your water supply valves.
There isn’t any code requirement for washing machine outlet valves in most locations except you need to install it at the most convenient and feasible location.
However, you need to take some things into consideration when you’re planning to get and install one for your washing machine.
Considerations for choosing an outlet box for your washer
- 1. Existing drainage and water supply configuration
There are a number of things you need to consider such as the pipe location and the cavity space available in your wall.
Not all washing machine outlets will be compatible with your existing configuration.
For example, if your existing drainage is such that water is supplied from the top, you need to choose an outlet box that is designed such that it can receive the water supply from the top as well as your washer’s drainage from the bottom.
- 2. Structural requirements
This is particularly important in new construction.
You need to make sure that the outlet box you go for is able to fit into the structural framing without having to alter it.
With that, you may have to choose a compact box.
You may also need to choose a metallic box rather than a plastic one depending on the fire requirements.
- 3. Finished height
Your washing machine outlet box should be installed 32 inches to 34 inches above the finished floor level.
Also, depending on the type of washer you intend to be using you may alter the height slightly to suit.
How to install a washing machine outlet box
2. Standpipe
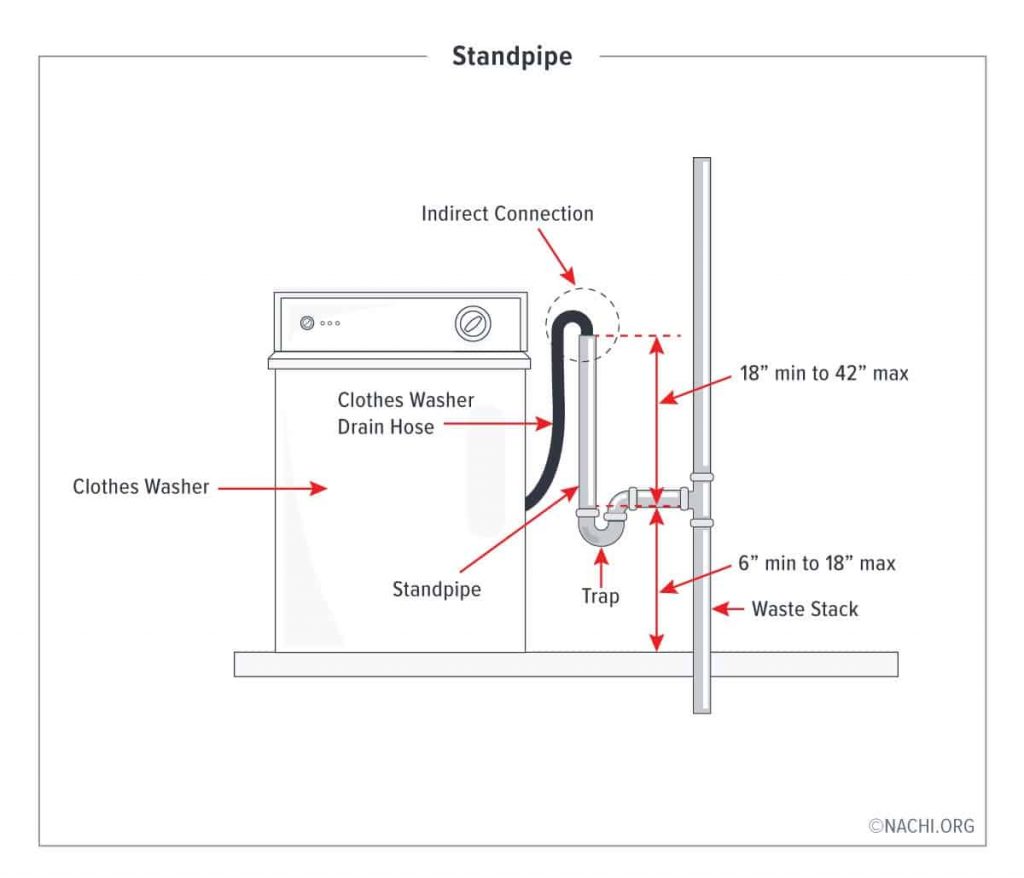
A standpipe is a vertical drain pipe that is used to drain your washing machine into a sewer line.
The drain hose of your washer is connected to the top of the standpipe which is fitted into the outlet box.
Dimensions of a washing machine standpipe

It is important that the dimensions of your washing machine standpipe are according to standards.
These may vary a bit depending on the building codes in your locality.
However, these are excerpts from the International Plumbing code regarding the dimensions of a standpipe that you can use as guidance.
SECTION 406 of The International Plumbing code
406.2 Waste connection. The waste from an automatic clothes washer shall discharge through an air break into a standpipe in accordance with Section 802.4 or into a laundry sink. The trap and fixture drain for an automatic clothes washer standpipe shall be not less than 2 inches (51 mm) in diameter. The fixture drain for the standpipe serving an automatic clothes washer shall connect to a 3-inch (76 mm) or larger diameter fixture branch or stack. Automatic clothes washers that discharge by gravity shall be permitted to drain to a waste receptor or an approved trench drain.
802.4.3 Standpipes. Standpipes shall be individually trapped. Standpipes shall extend not less than 18 inches (457 mm) but not greater than 42 inches (1066 mm) above the trap weir. Access shall be provided to standpipes and drains for rodding.
The guiding principle for the height of a standpipe for both top load washers and front load is that the top of the standpipe should be above the elevation of water in your washing machine when it is full during a wash cycle.
That is because, if the drain hose of your washing machine is connected to the standpipe and is below the water level during the wash cycle the water will spill from your washer.
Also, some newer washing machines generate a high amount of loads so you may want to use a bigger pipe size in other to avoid drainage issues in case your washer generates a high amount of load.
If you experience a backup of wastewater into your washer, it may be because your stand pipe’s size is not able to accommodate the load.
How to install washing machine drain standpipe
3. Drain Trap
A trap is a curved portion of a pipe that holds water in order to create a water seal.
This seal prevents sewer gases from backing up into your home through the drain.
All washing machine drain traps must have a minimum depth of 2 inches.
The most common type of trap is the P-trap, which gets its name from its shape which resembles the letter “P”.
The height of a washing machine P-trap is determined by the Uniform Plumbing Code (UPC) in the United States.
Your trap needs to meet the requirement of the codes else you may have legal issues.
These codes are for your own safety and good.
An improperly installed P-trap will end up bringing sewer fumes and blockages to your laundry.
The Uniform Plumbing Code mandates a washing machine P-trap height to be between 6 inches to 18 inches above finished floor level.
The is measured by taking the distance from the finished floor to the centerline of the trap’s arm.
To get an accurate measurement of the height of the P-trap, measure from the floor to the underside of the trap. and add half the diameter.
The Trap can’t be too high or too low as both have their disadvantages.
In most localities in the USA, it will be illegal to install a P-trap contrary the what is in the codes.
Always get in touch with your local building authorities to be well informed about the detailed requirements.
As far as your washer drains into the sewer line, you need to have a P-trap in your drainage configuration.
4. Drain line
The drain line is what connects the P-trap to either a feeder line or directly to the building’s main drain line.
The drain lines for both top and front load washers should have a minimum diameter of 2 inches.
However, the size of your drain line could be determined by the building code that applies to you.
In some cases, the code may require a 3-inch drain line.
It is advisable to go with what the code requires.
Related article: Is It Illegal To Drain Washing Machine Outside? (Find Out)
5. Vent
Every washing machine needs a vent to get rid of air trapped in the drain line.
The purpose of this vent is to allow air into the drainage system so that water can flow freely.
A properly installed vent also prevents negative pressure from developing in the drain line, which could cause sewer gases to back up into your home.
This is so because a well-vented washing machine drain system allows the P-trap to perform to its maximum.
When venting the laundry drain, keep these in mind:
- The vent should be a minimum of 1 1/2 inches in diameter.
- The vent stack should be at least 3 inches taller than the highest point in the drain line.
This is to ensure that gravity can do its job and pull water down the drain line.
- The vent should be installed as close to the washing machine as possible.
This minimizes the chance of negative pressure developing in the drain line.
- The vent should be installed so that it slopes upward at a minimum of 1/4 inch per foot.
This ensures that water can drain out of the vent if it ever becomes full.
- The vent should be installed so that it is easily accessible for cleaning.
This will help you keep the vent clear of any debris that could clog it and cause problems.
Conclusion
We have detailed all the requirements for a washing machine drain.
Whether you are starting a new construction, or looking to move your laundry this will guide you in setting up and installing trouble-free drainage for your washing machine.
Feel free to leave a comment below.
References


