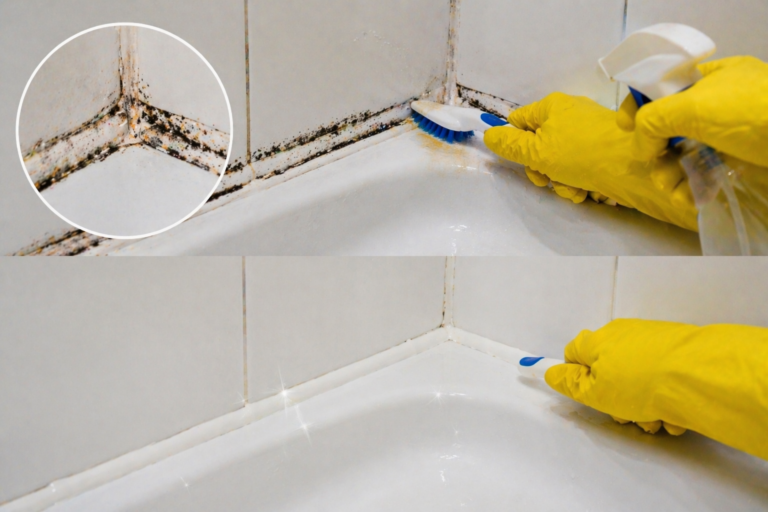
Black mould on bathroom sealant is one of the most frustrating cleaning tasks in the home.
It looks terrible, it’s stubborn, and it always seems to come back.
But with the right approach, the correct product, left on long enough, you can get silicone sealant and grout looking clean again.
Here’s everything you need to know, including the specific overnight method that actually works on deeply embedded mould.
Why Does Mould Grow on Bathroom Sealant?
Silicone sealant is waterproof itself, so you’d think it would be mould-resistant. But mould doesn’t grow in the sealant, it grows on it.
The surface of silicone sealant becomes coated with soap residue, body oils, shampoo, and moisture. These organic deposits are food for mould spores.
Bathrooms also provide exactly the conditions mould loves: warmth, near-constant humidity, and limited airflow.
The other issue is structural: over time, sealant can shrink, crack, or pull away from the surface slightly. Water gets behind it, creates a persistently damp environment, and mould establishes itself deep in the gap where you can’t reach it.
When that’s happened, even the best cleaning methods may only provide a temporary fix, replacing the sealant entirely is the real solution.
What You’ll Need
- Rubber gloves, safety glasses, and ideally a mask
- Old toothbrush or stiff-bristled brush
- White vinegar
- Baking soda
- Household bleach (chlorine-based)
- Spray bottle
- Plastic wrap (cling film) or cotton balls/tissues
- Clean microfiber cloths
Method 1: Baking Soda + Vinegar Paste (Mild Mould, Natural Option)
This is the best starting point for light surface mould on silicone sealant. It’s non-toxic and won’t damage the surrounding tiles or grout.
- Combine 1 cup of white vinegar with 2–3 teaspoons of baking soda in a small bowl. Stir to form a thick paste.
- Apply the paste directly over the mouldy sealant using an old toothbrush.
- Let it sit for 5 minutes to penetrate the mould.
- Scrub the sealant firmly in circular motions. Don’t press so hard you damage the sealant — firm but controlled pressure.
- Wipe away the paste with a clean, wet cloth.
- Rinse the area with clean water and dry with a microfiber cloth.
If some mould remains, move to Method 2.
| 💡 Pro Tip: Work in small sections rather than applying paste to the entire bathroom at once. Keeping it wet and active is key to effectiveness. |
Method 2: Bleach Solution (Moderate Mould, Most Effective Standard Method)
For mould that’s darker, more widespread, or returning quickly after cleaning with vinegar, bleach is more effective.
Bleach kills mould spores on the surface rather than just removing the stain, which helps slow regrowth.
- Mix 1 part household bleach with 4 parts water in a spray bottle.
- Spray the solution liberally over the mouldy sealant.
- Let it sit for 15–30 minutes.
- Scrub with a toothbrush or stiff brush.
- Rinse thoroughly with clean water. Bleach residue on silicone will accelerate deterioration over time.
- Dry the area with a clean cloth.
| ⚠️ Warning: Never mix bleach with vinegar, ammonia, or any other cleaner. The chemical reaction produces chlorine gas, which is toxic. Always ensure good ventilation when working with bleach — open windows and the extractor fan. |
Method 3: The Overnight Cling Film Method (Stubborn or Deeply Set Mould)
This is the method that makes the real difference when standard scrubbing doesn’t cut it.
Mould in sealant is often embedded below the surface. Spraying a solution on and wiping it off doesn’t leave it in contact long enough to penetrate and kill the mould at its roots.
The cling film trick keeps the cleaning solution wet and pressed firmly against the sealant for hours, dramatically increasing penetration.
Steps
- Apply your cleaning solution — bleach solution works best for this method. You can also use a commercial mould remover spray.
- Immediately cover the treated sealant with strips of plastic wrap (cling film). Press the wrap firmly into the sealant so it lies flat against it and seals in the moisture.
- Leave overnight — 8–12 hours.
- Remove the cling film in the morning.
- Scrub with a toothbrush and rinse thoroughly with clean water.
- Dry with a clean cloth.
For very stubborn cases, you can also roll sections of tissue or paper towel into thin strips, soak them in diluted bleach, lay them along the sealant line, and leave overnight without the cling film.
| 💡 Pro Tip: Do this before bed so you’re not breathing bleach fumes for hours. Leave the window open to ventilate overnight if possible. |
Method 4: Commercial Mould Remover Spray
If you’d rather use a purpose-built product, several US market options work very well on sealant:
- RMR-86 Instant Mold Stain & Mildew Stain Remover — extremely fast-acting, often removes stains within 15 seconds
- Tilex Mold & Mildew Remover — widely available at Home Depot and Walmart, effective on silicone
- Clorox Tilex Instant Mildew Remover — good for surface mould on sealant and grout
- HG Mould Spray — highly rated for bathroom silicone, available on Amazon
Always follow manufacturer instructions and ensure adequate ventilation.
When to Replace the Sealant Instead of Cleaning It
There’s a point where cleaning mouldy sealant becomes a waste of time — because the mould isn’t on the surface, it’s inside or behind the sealant.
Signs it’s time to replace:
- Mould returns within 1–2 weeks of thorough cleaning
- The sealant has visible cracks, gaps, or is pulling away from the surface
- Cleaning reveals the sealant is stained all the way through — it’s dark all the way to the adhesive layer
- The sealant feels spongy or soft rather than firm
Replacing bathroom sealant is a manageable DIY task:
- Score the old sealant with a utility knife and peel it away.
- Clean the gap thoroughly with rubbing alcohol and allow to dry completely — this is critical.
- Apply new mold-resistant silicone sealant (look for ‘anti-mould’ on the label).
- Smooth with a wet finger and allow to cure for 24–48 hours before getting it wet.
A tube of quality anti-mould sealant costs $8–$15 at any hardware store. Brands like GE Advanced Silicone 2 and DAP DynaSeal include built-in fungicide to resist future mould growth.
How to Prevent Mould Returning to Bathroom Sealant
- Improve ventilation: Run the bathroom fan during and for 20–30 minutes after bathing. If you don’t have a fan, open the window.
- Wipe the sealant dry: After showering or bathing, give the sealant lines a quick wipe with a dry cloth. This removes the moisture that mould needs to grow.
- Squeegee the tiles: Spending 30 seconds squeegeeing the tiles and shower walls after use dramatically reduces moisture.
- Use an extractor fan with a humidity sensor: These switch on automatically when humidity rises and off when it drops — taking the decision out of your hands.
- Apply a mould-inhibiting sealant spray: Products like HMK S34 Stone and Grout Sealer or similar sealant-protecting sprays can be applied over clean sealant to create a barrier.
Frequently Asked Questions
Can I use neat bleach on bathroom sealant?
Undiluted bleach is not recommended on silicone sealant. It can degrade the silicone over time, causing it to become brittle and crack sooner. Use a 1:4 bleach-to-water dilution. It’s still highly effective against mould.
How long does it take to remove black mould from sealant?
Light mould can be removed in 15–20 minutes. Deeply embedded black mould requires the overnight cling film method — plan for 8–12 hours of contact time before scrubbing. Severely moulded sealant may need to be replaced.
Is the black mould on my sealant dangerous?
The most common bathroom mould species (Cladosporium, Penicillium, Aspergillus) are generally not highly toxic but can trigger allergies and respiratory issues over time with repeated exposure. Always wear gloves and a mask when cleaning mould, and ventilate the room well.
Can I prevent mould by choosing the right sealant?
Yes. Anti-mould silicone sealants — labeled ‘mould-resistant’ or ‘anti-fungal’ — contain fungicide additives that make it much harder for mould to establish. They cost only slightly more than standard sealant and are absolutely worth using in bathrooms.
Why does mould keep coming back to the same spot on my sealant?
Recurring mould in the same spot usually means one of two things: there’s a persistent moisture source (a gap in the sealant letting water behind), or the cleaning method used didn’t kill the mould spores — just bleached the stain. The overnight cling film method and replacing sealant where it has failed are the solutions.
Related Articles: