Grout is the great equalizer in home cleaning. You can scrub your tile until it gleams and your bathroom still looks dirty if the grout lines are grey, brown, or black. And once grout gets to that point, standard bathroom spray does almost nothing.
The good news is that the most effective grout cleaners are not expensive specialty products. They are baking soda, hydrogen peroxide, and a stiff brush. This guide covers every major approach ranked from the gentlest to the most powerful, so you can match the method to the size of the problem.
Why Grout Gets So Dirty
Grout is made from a mixture of cement, sand, and water. That sandy, porous composition is what makes it such an effective trap for everything that passes through your bathroom: soap scum, body oils, hard water minerals, mold spores, and general airborne dust and grime.
Unlike smooth tile surfaces that can be wiped clean, grout lines hold onto staining at a structural level. The same porosity that gives grout its grip on tile also gives it grip on every contaminant that lands on it. This is why surface-level cleaning with sprays barely makes a dent on old grout staining.
The other major culprit is moisture. Shower grout that stays damp between uses is an ideal environment for mold and mildew, which creates the black and dark grey discoloration in shower grout lines specifically.
Before You Start: Identify Your Grout Problem
Different types of grout staining respond to different cleaners:
- Grey or brown surface staining: Dirt, soap scum, and mineral deposits. Most methods below work well.
- Black or dark spots: Mold and mildew. Needs a disinfecting approach. Hydrogen peroxide or bleach.
- Yellow or rusty tinge: Iron mineral deposits from hard water. Needs an acid-based approach. White vinegar or citric acid.
- Overall dullness after cleaning: The grout may be permanently stained and need sealing or re-grouting rather than cleaning.
Also note your grout color before you start. Hydrogen peroxide has mild bleaching properties and can lighten naturally dark or pigmented grout slightly with repeated use. Test a small hidden area first if your grout is intentionally a dark or bold color.
Grout Cleaning Methods, Ranked Easiest to Most Powerful
Method 1: Hot Water and a Stiff Brush (For Maintenance)
If you clean your grout regularly, hot water and a dedicated grout brush is all you need to maintain clean lines. No chemicals, no mixing, no wait time. This method prevents the buildup that requires the stronger approaches below.
- Boil a kettle and let it cool for two minutes so it is very hot but not scalding.
- Pour along the grout lines, working in small sections.
- Scrub immediately with a stiff-bristled grout brush or an old electric toothbrush.
- Rinse and dry the tile.
Best Tool: A cheap electric toothbrush used only for grout cleaning covers lines faster than scrubbing by hand and delivers better results with less effort.
Method 2: Baking Soda and Water Paste
Baking soda is mildly abrasive and alkaline, which means it loosens grease and dirt while the physical scrubbing action lifts it from the pores of the grout. This is the workhorse of natural grout cleaning.
- Mix baking soda with just enough water to form a thick paste, roughly the consistency of toothpaste.
- Apply directly to grout lines using your finger, a spoon, or a squeeze bottle.
- Let the paste sit for 5 minutes.
- Scrub firmly with a grout brush or old toothbrush.
- Rinse thoroughly with warm water.
This method works well on light to moderate surface staining and is safe for all grout types and tile surfaces.
Method 3: Baking Soda and Vinegar (For Surface Dirt and Light Stains)
Adding white vinegar to baking soda creates a fizzing reaction that helps lift loosened dirt from the grout surface. This is one of the most popular DIY grout cleaning combinations.
- Apply baking soda paste generously to the grout lines.
- Fill a spray bottle with undiluted white vinegar.
- Spray the vinegar over the baking soda. It will fizz immediately.
- Let it sit and fizz for 5 to 10 minutes.
- Scrub with a stiff brush.
- Rinse well with warm water and dry.
Natural Stone Caution: Never use vinegar on natural stone tile (marble, travertine, limestone). The acid in vinegar etches and damages stone surfaces permanently. Use only baking soda with water on natural stone.
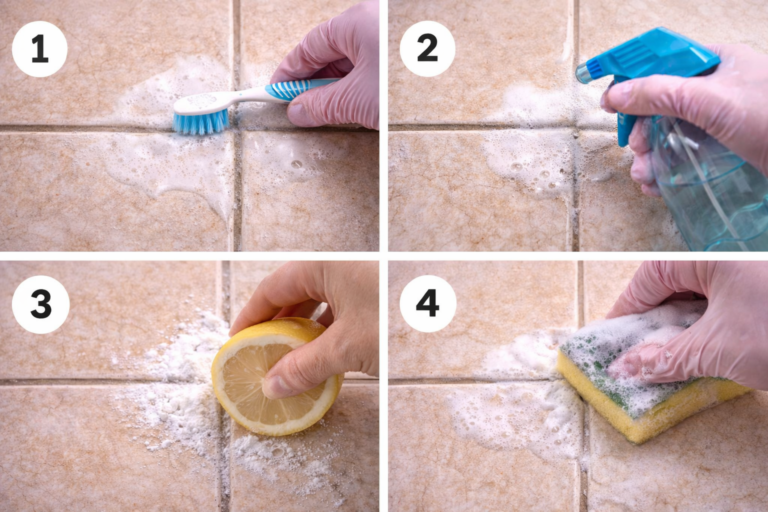
Method 4: Hydrogen Peroxide and Baking Soda (Best Overall DIY Method)
This combination is the clear winner in independent tests for DIY grout cleaning. A head-to-head comparison at Apartment Therapy rated this method 9 out of 10, significantly outperforming both baking soda alone (5/10) and vinegar (3/10) on the same dirty grout.
Hydrogen peroxide at the standard 3 percent drugstore concentration is a mild oxidizing bleach. It brightens grout, kills mold and mildew spores, and disinfects without the harshness of chlorine bleach. The baking soda provides abrasive scrubbing power.
- Mix 1/2 cup baking soda with 1/4 cup hydrogen peroxide (3 percent) to form a paste.
- For extra cutting power, add 1 teaspoon of dish soap to the mixture and stir.
- Apply to grout lines using a spoon, squeeze bottle, or old toothbrush.
- Let sit for 10 to 15 minutes. For badly stained grout, leave for 30 minutes.
- Scrub firmly with a stiff grout brush, toothbrush, or electric toothbrush.
- Rinse with warm water and wipe dry.
Make Fresh: Mix only what you need for each cleaning session. Hydrogen peroxide degrades when exposed to light over time, reducing its effectiveness. Always use fresh solution.
Squeeze Bottle: Mixing in a small squeeze bottle lets you apply directly to grout lines with precision, keeping it off the tile and reducing waste.
Method 5: Oxygen Bleach (OxiClean) for Heavy Staining
Oxygen bleach is the strongest of the non-chlorine cleaning options. Products like OxiClean use sodium percarbonate, which releases hydrogen peroxide when dissolved in water. The result is a highly effective stain-lifting and disinfecting treatment that is safer for grout and tile than chlorine bleach.
- Dissolve 2 tablespoons of OxiClean powder in 1 cup of warm water.
- Apply the solution to the grout lines and let soak for 20 to 30 minutes.
- Scrub with a grout brush.
- Rinse thoroughly with clean water.
This method is particularly good for grout that has gone very dark over years of neglect. It may take 2 or 3 treatments on severely stained grout.
Method 6: Chlorine Bleach Gel (Last Resort)
Chlorine bleach is the most powerful grout whitener but carries the most risk to surrounding surfaces and your health. Use it only on white or very light grout where the other methods have not worked, and only when you have good ventilation.
Never apply bleach to colored grout: it will strip the color. Never use bleach on natural stone tile. Never mix bleach with vinegar or any other acidic cleaner.
For grout application, a gel or spray bleach (like Clorox Bleach Gel or Tilex) clings to the grout lines better than liquid bleach. Apply, leave for 5 to 10 minutes, scrub, and rinse thoroughly.
Steam Cleaning: The Chemical-Free Nuclear Option
If you have access to a steam cleaner, high-temperature steam is one of the most effective grout cleaning methods available and uses no chemicals at all. Steam penetrates the pores of the grout and loosens deeply embedded dirt that chemical methods cannot reach. It also kills mold and bacteria on contact.
Use the narrow brush attachment for grout lines. Work in slow passes. Follow with a wipe-down to remove the loosened grime.
Preventing Grout from Getting Dirty Again: Sealing
Once your grout is clean, applying a grout sealer is the single best investment you can make in keeping it that way. Grout sealer creates a protective barrier that makes the porous surface water and stain resistant, dramatically reducing how much dirt adheres.
- Apply grout sealer after a deep clean and once the grout is fully dry
- Most standard penetrating sealers should be reapplied every 1 to 2 years
- For shower grout specifically, annual sealing is worth the effort given the constant moisture exposure
- Spray-on grout sealers are available at Home Depot or Lowes for around $10 to $20 and cover large areas quickly
Frequently Asked Questions
Q: What is the single best DIY grout cleaner?
The most consistently effective DIY grout cleaner in side-by-side testing is a paste made from baking soda and hydrogen peroxide (3 percent), with a small amount of dish soap added for extra cutting power. It outperforms vinegar, baking soda alone, and most commercial sprays on bathroom grout staining.
Q: Can I use bleach on grout?
You can use diluted chlorine bleach on white or light uncolored grout as a last resort for severe staining. Do not use bleach on colored or pigmented grout (it will strip the color), on natural stone tile, or near chrome or metal fixtures. Always ventilate the room and rinse thoroughly. Oxygen bleach (OxiClean) is a safer and often equally effective alternative.
Q: Does vinegar actually work on grout?
Vinegar works on light soap scum and surface grime on ceramic tile grout but is not particularly effective on deeper staining. Independent tests have rated it significantly below hydrogen peroxide and baking soda. It should never be used on natural stone tile. If you are going to use a DIY method, the baking soda and hydrogen peroxide combination delivers much better results.
Q: How do I stop my grout from going black?
Black grout in showers is caused by mold growth. The best preventions are improving ventilation (use the bathroom fan during and after showers), squeegeeing tile walls after each shower to remove standing water, and applying grout sealer annually. Running the bathroom fan for 20 minutes after showering makes a significant difference to mold growth rates.
Q: My grout is clean but still looks dull grey. What can I do?
If the grout has been deeply stained for years, cleaning may not fully restore the original color. Options at this point are: grout paint or colorant (available at hardware stores) which comes in a range of colors, re-grouting, or professional grout cleaning and sealing which uses equipment and products not available to consumers.
Related Articles: